GPS Satellite Navigator Basic Operation and Interface Setting
Practical operation - Parameter configuration - Troubleshooting
I. GPS Satellite Navigator Basic Operation
( I ) Start-up and information reading
Press the “ ” key to turn on the power. Start the screen for 30s and the last used screen appears as shown in Fig. 2-2-1.
 Figure 2-2-1 Power On Screen and Display Interface
The GP-170 is available in two sizes, with and without the DGPS/DGLONASS beacon receiver.The GPS satellite navigator status indication is shown in one of the indications in Table 2-2-1:

| status indicator | State Meaning |
|---|---|
| two-dimensional positioning | 3 satellites were used. |
| 3D positioning | More than 4 satellites were used. |
| unmonitored | The status of the receiving beacon station is not monitored. |
| Error Rate > 10% | Receiving beacon station error rate exceeds 10%. |
(ii) Adjustment of display mode
There are five display modes:PLOTTER, SAT VIEW, HIGHWAY, COURSE and DATAPress the “DISPLAY” key to select the display mode in the following order. Press “DISPLAY” to select the display mode in the following order. To reverse the order, press and hold down the “DISPLAY” key, then press “▽” or "▲" to select the display mode.
(1) Press “MENU/ESC” to open the main menu.
(2) Select [1 Display] and then [9 Display Selection].
(3) Select [3 HIGHWAY], [4 COURSE] or [5 DATA].
(4) Select [1 ON] or [2 OFF]. When the “DISPLAY” key is operated, the display mode set to off is skipped.
(5) Press “MENU/ESC” to close the main menu. The data is arranged according to the data type.
The selected display mode is shown in the upper left corner of the screen, as shown in Figure 2-2-2. Figure 2-2-3 and Figure 2-2-4 show the plotter display mode and data display mode respectively.

Note: The color of the ship's position data depends on the positioning status.
● Black: GPS and/or GLONASS positioning.
● Red: No GPS and/or GLONASS fix.
Note: Selecting Data Display Mode in the main menu 8 System Settings, and then selecting 4 User Definition, you can independently select the data display of the interface in the list information.
(iii) Initialization settings for on-board GPS satellite navigators
1. Start-up and hardware diagnostics: Press the “POWER” key to turn on the device and the system performs the following automatic tests in sequence:
(2) Memory test: Verify Flash ROM (program memory) and SRAM (static random memory) read and write functions.
(3) Power module detection: Confirm the built-in backup battery voltage and power supply stability.
(4) Network port self-test: detects the physical connection and protocol handshake status of the [2 IP ADR/Port] and other communication interfaces (e.g. NMEA 2000, IEC 61162-450).
2. Confirmation of the results of the self-inspection:
(1) Make sure the screen displays the “SYSTEM OK” prompt.
(2) If the device integrates an external sensor module (e.g. AIS receiver or weather station), “EXTERNAL SENSOR CONNECTED” is displayed.
3. Detailed status verification path: MENU > SYSTEM STATUS > HARDWARE DIAGNOSTIC Confirm that the following items are marked “OK”: Program memory, SRAM, Backup battery, Satellite receiver module, Network port, External sensor interface.
II. GPS Satellite Navigator Interface Settings
In addition to the basic function of displaying positions, the GP-170 is capable of outputting a variety of data to external devices. Before outputting data to an external device, the operator should first determine the type of data required by the external device. When outputting, only the necessary data should be sent. All data is prefixed with a two-character code known as the“Talker.”GP-170 can use “GP (GPS signaling)” and also supports “LC (Roland)” or “DE (Desktop Card)”. Due to the newer “GP Send” system, earlier models may not be recognized.
(i) Setting output 1, 2, 3 or 4
(2) Select [7 I/O] → Select [1 Output Data1].
(3) Select [1 Mode] → Select [1 IEC/NMEA] (statement output) or [2 RTCM] (binary output).
(4) Select [2 Format] → Select [1 IEC 61162-1 Ed.4/5], [2 IEC 61162-1 Ed.3], [NMEA V2.0] or [NMEA V1.5].
(5) Select [3 Talker] → Select [1 Auto]* (select this for SOLAS ships), [2 GP] or [4 GN].
(6) Select [4 BPS] → Select [4800 bps], [9600 bps] or [38400 bps].
(7) Select [5 Sentence] → Use the cursor pad to select the sentence and press the “NU/CU ENT” button.
(8) Select TX interval: [-] (off), [0.1 s]*, [0.2 s]*, [1s], [2s], [3s], [4s], [5s], [6s], [10s], [15s], [20s], [30s], [60s] and [90s].
*: Only for GGA**, GLL, GNS, RMC and VTG when [38400 bps] is selected in step (11). (**: Only for GPS mode)
(9) Note: When setting the TX interval, keep the load rate below 100%. If the rate exceeds 100%, TX intervals other than the ZDA statement cannot be guaranteed.
Statement Interpretation:
ZDA. UTC Date, time, local time, time zone; GGA. GPS global positioning data (time, latitude, longitude, mass, number of satellites, DOP value, etc.); GLL. Earth coordinates; VTG. Ground speed information (SOG/COG); RMC. Recommended minimum GPS data format; AAM. Waypoint arrival alarm.
(ii) Setting up Ethernet
Path: MENU > [7 I/O] > [5 Ethernet].
(2) Select [2 IP ADR/Port] → Enter the IP address and port (range: 49152 to 65535).
(3) Dual configuration settings: Set the IP address to “239.192.000.004”The port is set to “60004”。
(4) Select [3 MP] → Select [1 Enable] or [2 Disable].
(5) If enabled, enter the corresponding IP address and port in [4 MP IP ADR/Port] and [5 ND IP ADR/Port] respectively.
(iii) Selection of input data (Data Source Select)
Path: MENU > [7 I/O] > [6 Data Source Select].
(2) If [5 Ethernet] is selected, enter Ethernet. SFI (System Function ID): An identification code consisting of two letters and four numbers.
(3) Priority settings: Select [7 Data Priority] to enter the order by data number. For example, enter “1, 2, 4” to indicate that the order of priority is Data1, Data2, and Data4.
(4) Similarly set [2 STW] (water speed), [3 SST] (sea surface temperature) and [4 DPT] (water depth).
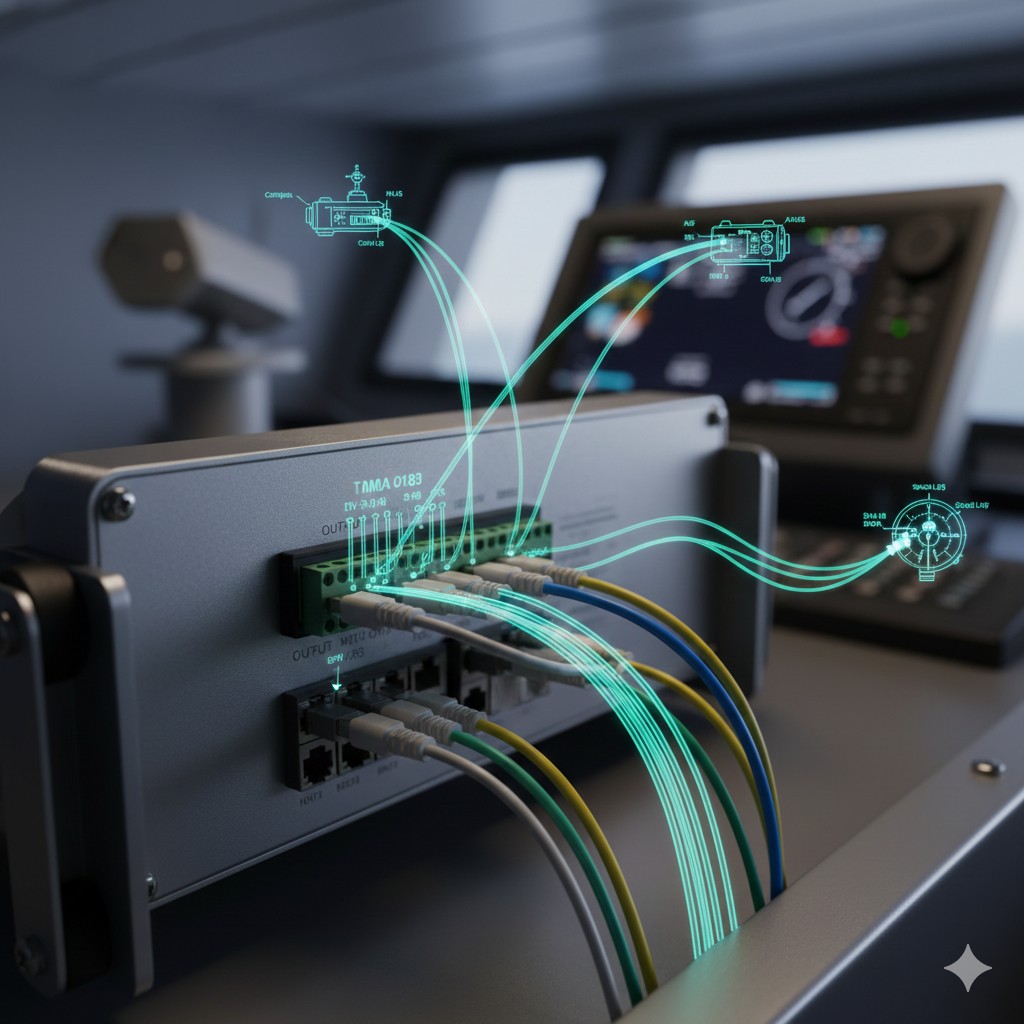
GP-170 NMEA 0183 Interface Wiring and Data Flow Logic Diagrams
(Corresponds to chapter 2 of the article: Interface setup practices)
(Data Source Select)
- Electro-radiographic (HDG)
- Tachymeter (STW)
- Depth sounder (DPT)
(Data processing and protocol conversion)
● Frequency filtering (TX Interval)
:: Load-balancing calibration
(iec 61162-1 / nmea 0183)
| Output 1. | Radar (VBT/GLL) |
| Output 2. | AIS (GGA/RMC) |
| Ethernet. | VDR/ECDIS (UDP 60004) |
Pin Configuration
| Signal Name | Common thread colors | Functional Description | Note |
|---|---|---|---|
| TD-A / TD-B | White / Blue | Send data (Transmit) | Connect to the RD side of the radar/AIS |
| RD-A / RD-B | Yellow / Green | Receive | Powering up the compass/tachometer output |
| FG / Shield | woven network | Shielded ground | Single-ended grounding for protection against electromagnetic interference |
💡 ETO Field Commissioning Tip:
Confirm when GPS coordinates cannot be displayed by an external device (e.g. radar):
1. Talker Settings: Is the GP-170 set to “GP” or “Auto”, older radars may only support “GP”.
2. Reverse polarity: NMEA 0183 is a differential signal and if TD-A/B is reversed, the data stream will not be recognized.
3. Baud rate matching: Verify that the BPS (4800/9600) in the Output setting is exactly the same as the device setting on the receiving end.


