
Operation and Setup of AIS Devices (Full Volume Technical Manual)
Automatic Identification System - FURUNO FA-150 Practical Instructions
The Automatic Identification System (AIS) uses the very high frequency (VHF) maritime mobile band. It uses Time Division Multiple Access (TDMA) technology to automatically broadcast and receive information from ships. These include static information, dynamic information, voyage information and safety messages. Through these operations, AIS can realize the functions of ship identification, surveillance and communication.
AIS has more components, including shipboard mobile stations, base stations (shore stations) and their facilities, beacon stations, airborne and search and rescue mobile stations. It is a digital navigational aid system, which takes information technology as its core and integrates satellite positioning technology, digital communication technology, information processing technology and computer network technology.
For marine electronic electricians, it is necessary to master the basic operation of AIS equipment. These operations include equipment self-testing, information viewing, input/output interface setting, and connection with other equipment. At the same time, they should also have the ability to maintain and manage the AIS equipment. In this chapter, we will take the FURUNO FA-150 AIS device as an example and introduce it in detail.
I. Basic Operation and Information Viewing of AIS Devices
(i) Power supply
The crew will keep the AIS onboard equipment switched on when the ship is underway, at anchor or in any other condition. If the continuous operation of the AIS equipment could pose a danger to the ship, for example if the ship is traveling in an area where there is pirate activity, the ship's captain may decide to turn the equipment off. When the danger is gone, the crew will turn the device back on.
The AIS device will save the ship's fixed information and navigation related information during the time the device is switched off. When the crew turns on the power to the device, the AIS device will send the information within 2 minutes. The device will automatically record the power on/off time as a safety record, and the crew also need to record these times in the logbook. When the ship is in port, the crew must comply with the port regulations when operating the AIS device.
Crew members need to understand the operation of the equipment in conjunction with the equipment manual and follow the steps below to complete the operational tasks.
(ii) Keystrokes
The AIS device adopts the MKD keyboard configuration, and the keys are very simple. As shown in Figure 3-1-1, the operation display interface of FURUNO FA-150 AIS device is equipped with cursor displacement navigation keys “▲▼◀▶”, confirmation key “ENT”, menu key “MANU The device is equipped with cursor displacement navigation key ”▲▼◀▶“, confirmation key ”ENT“, menu key ”MANU“, display switching key ”DISP“, shortcut function key and power key ”PWR", etc. Some of the devices can also include 10 keys. Some devices may also include 10 alphanumeric keys, the "*" key, the "#" key, and so on. Some AIS devices can display an English soft keyboard on the screen when text information needs to be entered.
 Figure 3-1-1 FURUNO FA-150 AIS Unit Operation Display Interface
Cursor displacement navigation keys are used to move the cursor position on the screen. The Confirm key is used to execute the operation item displayed at the cursor position, or to complete data entry. The menu keys are used by the user to complete equipment settings or to perform various functions. In different navigational situations, the user can select the most appropriate display by continuously pressing the display switch key.
(iii) Display
The purpose of the AIS equipment display is to show the equipment operation information, real-time information of the ship and real-time information of the target ship, and at the same time to monitor the operation of the system and the sea navigation traffic. The display can be a simple display (as shown in Figure 3-1-1), or other suitable displays with user-friendly interfaces can be used, such as computer terminals, PPU radars (as shown in Figure 3-1-2) and ECDIS (as shown in Figure 3-1-3). The radar or ECDIS is capable of presenting a wealth of AIS information visually on a navigational background, using icons and alphanumerics. This helps mariners to understand the overall traffic condition and make decisions on ship collision avoidance, and it is a more ideal equipment for displaying AIS information.
1. Targeted information display:A common type of simple display is the embedded LCD display. In accordance with international standards, for selected targets, such displays provide at least three lines of information, including the bearing, distance and vessel name of the target, and other information can be scrolled. Radar and ECDIS have larger screens suitable for displaying alphanumeric information. They can usually display AIS information for multiple targets at the same time, which also facilitates information analysis and editing.
2. The target icon is displayed:The icon display method is also called diagram display or graphic display method. This method can visually present the changing traffic around the vessel and is helpful for vessel collision avoidance operations. Figures 3-1-1, 3-1-2, and 3-1-3 show the icon display screen for AIS information on the simple display, radar, and ECDIS display, respectively.
 Figure 3-1-2 AIS Information Displayed on Radar Screen
 Figure 3-1-3 AIS Information Displayed on ECDIS
 There are six types of AIS shipboard equipment targets on the display using the icons shown, namelyActivated Targets, Dormant Targets, Selected Targets, Dangerous Targets, Missing Targets, and Profile TargetsTable 3-1-1 lists the icons corresponding to the AIS shipboard equipment reporting objectives. Table 3-1-1 lists the icons corresponding to the targets reported by AIS shipboard equipment. In addition, the base station is usually displayed as a diamond-shaped “+” symbol with a chart symbol and a “cross” in the center; the AIS real beacon is only displayed as a diamond-shaped “+” symbol with a “cross” in the center; the AIS virtual beacon displays an uppercase “+” symbol on the “cross”; and the AIS virtual beacon displays an uppercase “+" symbol on the "cross". AIS real beacons only display a diamond-shaped "+" symbol with a "cross" in the center; AIS virtual beacons display a capital "V" on the "cross", i.e., "V" in the center.“V”; AIS-SART displays the symbol “⊗” and the text message “SART-ACTIVE”. On the color display, different types of AIS equipment and ships can also be shown in different colors for easy identification.
| Icons corresponding to AIS shipboard equipment reporting objectives (summary) |
|---|
| Includes 6 categories of core icon representations such as Active, Dormant, Selected, Dangerous, Missing, and Outline Target. |
3. Display of information about the vessel:In this display mode, the monitor is responsible for presenting the ship's dynamic information and voyage information. At the same time, the operator is able to input and edit the voyage information.
4. SMS display:When the AIS device receives a short message, an alert will appear on the screen. The read message will be saved by the device, and the user can retrieve and read it several times, or delete it. The user can input, edit and store the short message by operating the keys or soft keyboard, and send the message in the way of designated sending or public sending. For Designated Send, users can select the MMSI code, message type (secure or text), channel (auto select, A channel, B channel, A&B channel, etc.). The device usually records sent messages automatically; if sending fails, the screen will give an indication. All read and sent messages can be displayed in a chronological list.
5. Alarm message display:The AIS device supports acknowledging, displaying and querying alarm information, which covers the status of built-in and external positioning devices, alarm information of sensors, transceiver alarms and so on. The alarm information displayed on the monitor includes alarm time, number, trigger conditions, acknowledgement status and text description. By viewing the alarm information, the operator can grasp the working condition of the equipment, find and troubleshoot the equipment in time, and ensure the normal operation of the system.
II. AIS Input/Output Interface Settings
(i) Setting the I/O (input/output) communication port (SET I/O PORT)
(1) Select “INIT SETTINGS” in the main menu, press “▽” and “▲” to select “SET I/O PORT”, press “ENT”. In the initial setting menu window, press "▽" and "▲" to select "SET I/O PORT", and press "ENT" key.
(2) Select “SET COM PORT” and press the “ENT” key as shown in Fig. 3-1-4.
 Figure 3-1-4 I/O Interface Settings
(3) Select a suitable port among COM1~COM6 and press the “ENT” key. The following is an example of COM1 port.
(4) Press the “ENT” key to display the COM1 port, and then press the “ENT” key again to display the mode setting display window.
(5) Use “▽” and “▲” to select the connected device:
● LONG RANGE. Remote communications equipment, e.g., Inmarsat C.
● EXT DISPLAY. External display units such as radar, ECDIS, pilot interface PPU, etc.
● DISABLE. When the COM1 port is not used. Set according to the specific interface.
(6) Press “ENT” key to display the speed setting window, press “▽” and “▲” to select data format or data transmission rate:
● IEC 61162-1. Data transfer rate 4800 bit/s.;
● IEC 61162-2. Data transfer rate 38.4 kbit/s, press “ENT” key as shown in Fig. 3-1-5.
 Figure 3-1-5 COM1 Port Setting
(7) Press “MENU” key to save the setting. Use similar method to set COM2~COM6 ports, COM5 and COM6 ports are mainly for sensor SENSOR interface, such as GPS, gyrocompass, rangefinder, slew rate meter, etc.
(8) Setting the PC port is similar to the COM port.
(9) Press the “MENU” key to save the setting.
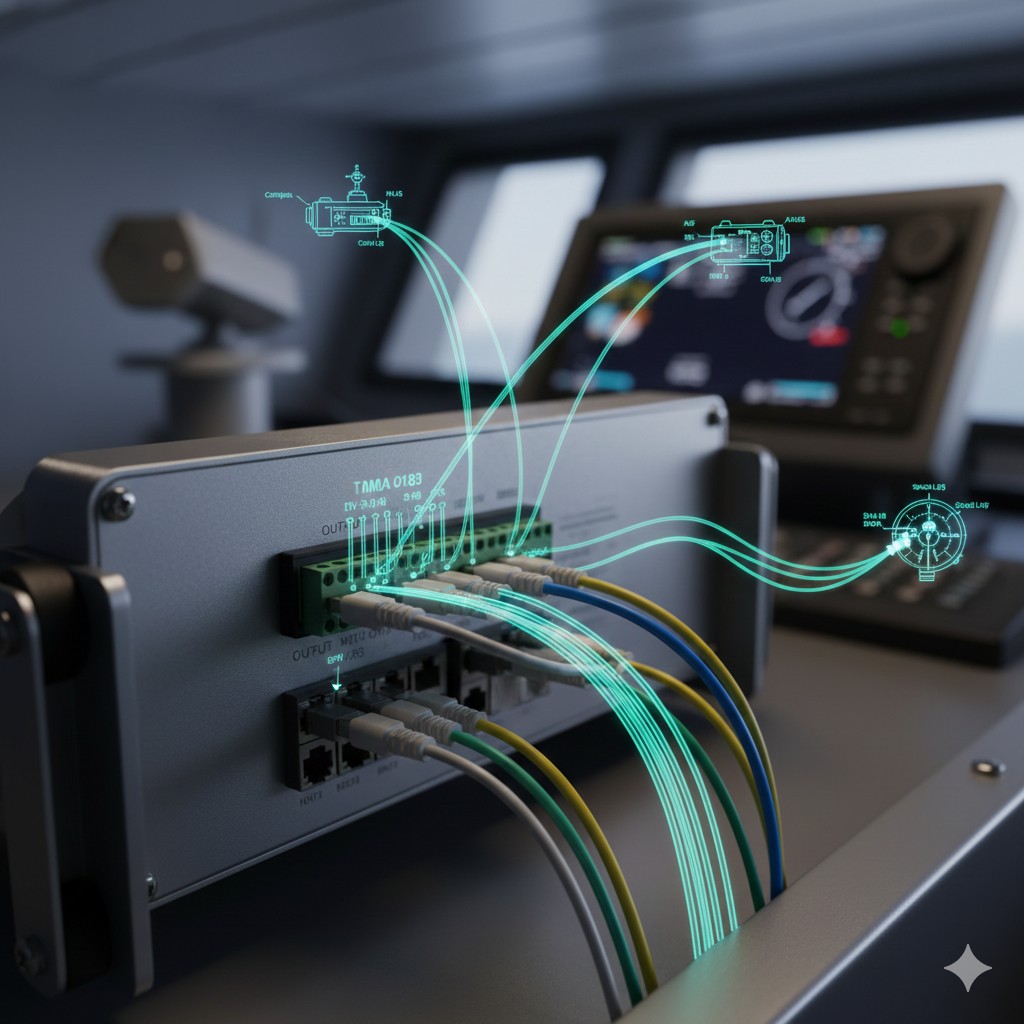
According to the setting of COM1~COM6, select the TD terminal of the corresponding interface to connect the signal from the input device (e.g. GNSS receiver or compass). Select the RD terminal of the corresponding interface to connect the signal to the output device (e.g. radar or VDR), as shown in Figure 3-1-6.
 Figure 3-1-6 I/O Interface Terminal Diagram
(ii) Setting I/O (input/output) communication port priority
(1) Select “INIT SETTINGS” in the main menu, choose I/O port setting in the initial setting menu window, press “▽” and “▲” to select I/O communication port priority setting in I/O setting submenu, and press “ENT” as shown in Fig. 3-1-7. In the I/O setting submenu, press "▽" and "▲" to select I/O communication port priority setting, and then press "ENT" key, as shown in Figure 3-1-7.
 Figure 3-1-7 I/O Priority Setting
(2) Select “L/L COG SOG”, press “ENT” key. Select COM4, press the “ENT” key to bring up the setting window, select the priority level of I/O port COM4 (ship's position, course to earth, speed to earth), press the “ENT” key.1 highest level, 3 lowest level。
(3) Set the priority level of COM5 and COM6 ports in a similar way.Be careful not to set the same number in the middle of COM1, COM2 and COM3.。
(4) Press the “MENU” key to return to the priority setting menu.
(5) Press “▽” and “▲” to select “HDG” (Bow Direction), and press “ENT”. Set the priority of HDG data in the same way as you set the ship's position, heading and speed.
(6) Press “▽” and “▲” to select “ROT” (Rotation Angle Rate), press “ENT”. Press "ENT" key. Set the priority of ROT data in the same way as for ship's position, heading and speed.
(7) Press the “MENU” key several times to save the above settings.
In addition to the above settings, there are also basic menu operations and adjustments, including brightness and contrast adjustments, setting the destination port, setting the sailing status, setting the CPA and TCPA, viewing and editing the channels, setting the buzzer, etc., which will not be repeated for the sake of space, and which can be found in the installation manual of the device.
AIS (FA-150) Physical Wiring and Data Flow Logic Diagrams
(Corresponds to Chapter 2 of the article: I/O Interfaces and Port Settings)
(COM 5/6 ports)
- GPS (ship's position/COG/SOG)
- Dhritarashtra (HDG)
- Meter (LOG)
- Rotameter (ROT)
TD ➡ RD
(TDMA time division multiple access processing)
:: Static/dynamic/voyage information encapsulation
:: Prioritization of data from multiple sources
TD ➡ RD
(COM 1/2/3 ports)
| Radar (RADAR). | Target Override Display |
| ECDIS. | Electronic Chart Target Overlay |
| VDR. | Voyage data logging |
1. Physical wiring:The transmitter (TD) of the signal source is connected to the receiver (RD) of the AIS; the transmitter (TD) of the AIS is connected to the receiver (RD) of the external display device.
2. Rate Matching:When connecting the radar/ECDIS it is important to select the 38.4 kbit/s (IEC 61162-2), otherwise a large amount of target information can lead to overflow.
3. Priority:When there are multiple GPS accesses, you must set the priority level (1 is the highest) in the menu to avoid location information conflict.


